Solution Recipes are tutorials to achieve specific objectives in Klaviyo. They can also help you master Klaviyo, learn new third-party technologies, and come up with creative ideas. They are written mainly for developers & technically-advanced users.
Note: We do our best to make sure any code and API references are accurate and current when this is published, but you might need to update code and it’s always a best practice to leverage ourlatest API versions. If you have questions, feel free to hop over to our Developer Community.
How to use a signup form and a Hosted Page in conjunction with Javascript to serve your customers dynamic content and capture additional details from their interactions in Klaviyo.
A Hosted Page is a powerful tool within your Klaviyo toolbox that requires less technical setup than hosting your own page, and can allow you to consolidate logic across multiple webpages into a single webpage, making testing and changes easier.
Moderate
Introduction
Klaviyo’s Hosted Pages functionality allows customers to custom-code HTML, Javascript, and CSS on a page that is hosted by Klaviyo. One common use case for this is designing a custom email subscribe/unsubscribe page, but this article will highlight a less-common, creative use for a Hosted Page.
Signup forms allow you to capture user information and grow your email/SMS list on your website. However, if you embed the same signup form across multiple webpages, it can be difficult to dynamically capture data related to what part of the website someone is on.
This article will walk through how to combine signup forms with a Hosted Page to serve content and capture dynamic customer data in a streamlined fashion. This article can also be used as creative inspiration around the flexibility that Hosted Pages provide.
Challenge
The case we are exploring today is using forms to collect emails in exchange for downloadable content. Some organizations use forms as a method of serving up downloadable content to users, where a site visitor can submit an email address in a form, and is then upon successful submission a page renders with a link to download a file from the site.
If you have one piece of content, this is easy. You could create a single form with the success page rendering a hard-coded download link that corresponds to the file of interest. However, what if you want to have a Klaviyo form that works for dozens or hundreds of pieces of content, each with its own download link? It becomes really tedious or altogether impractical if you ever need to make changes to the forms. So, here I’ll walk you through a solution. This solution allows for:
- The creation of a single Klaviyo form to be leveraged across the site while still allowing for different files to be downloaded, depending on the page where the form is displayed.
- The addition of a profile property reflecting the content downloaded which enables downstream segmentation and personalization and easy changing of email preferences by the user.
- A setup that is easy to modify or extend and easy to test.
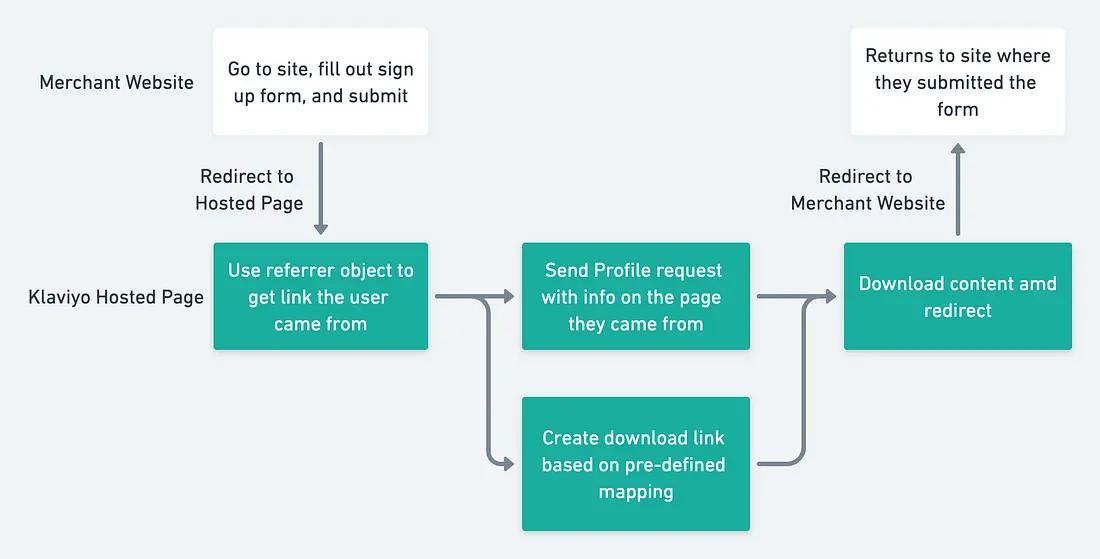
In order to accomplish this, we will construct a solution where visitors to a website (1) input their info into a signup form and upon submission are (2) redirected to a Hosted Page, which (3) downloads the applicable content (which varies depending on which page they came from), then (4) are redirected back to the page they where they originally completed the sign up form. The flowchart below walks through this solution:
Ingredients
- Klaviyo Hosted Page (available for any account with paid plan that has passed account verification)
- Klaviyo Embedded Signup Form
- Intermediate HTML/Javascript
- Imagination!
Instructions
Step 1: Create a signup form and embed it on your website
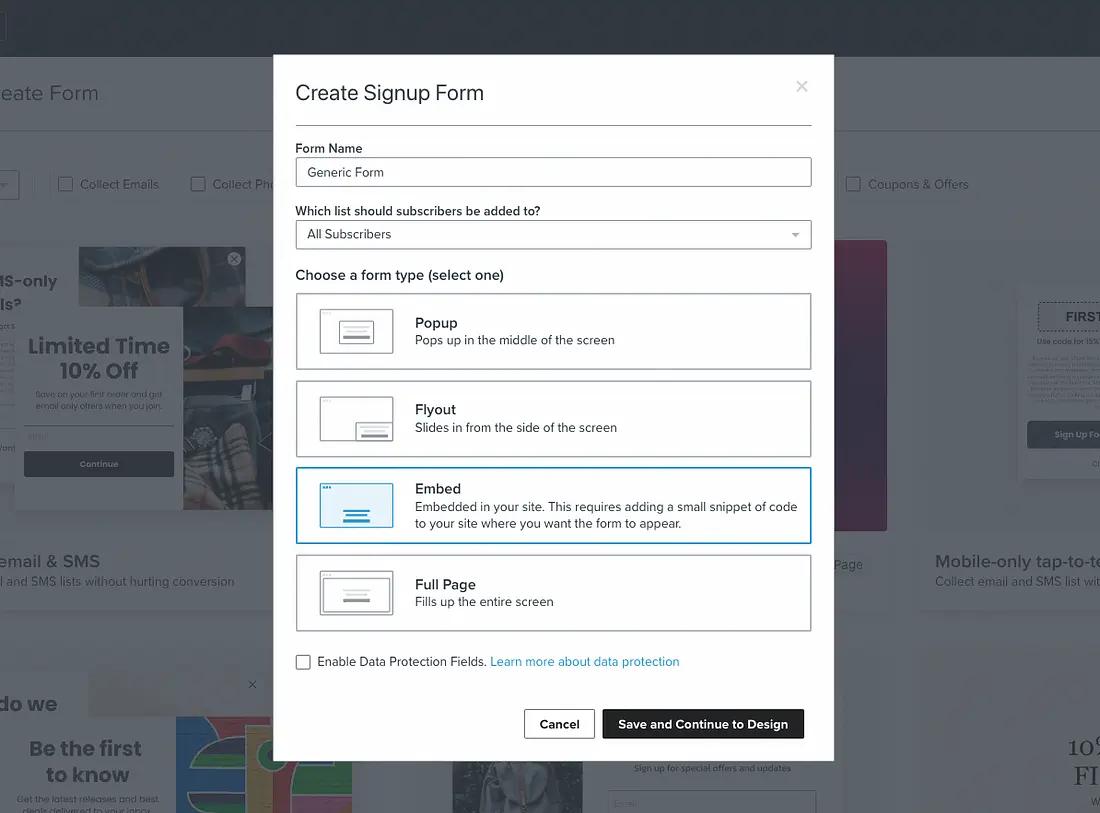
In your account, navigate to the Signup Forms tab and create a signup form. We will be creating a two-step email form for this example, so select “Build From Scratch” on the Signup Forms tab. Name the form, choose a list to connect the form to, and select the “Embed” form type. Click “Save and Continue to Design” once you are ready.
On the design page, under the “Email Opt-In” step, add any fields you want to capture in Klaviyo. In this example, we will capture a field for the user’s Interest Area as part of a dropdown, along with their name and email address.
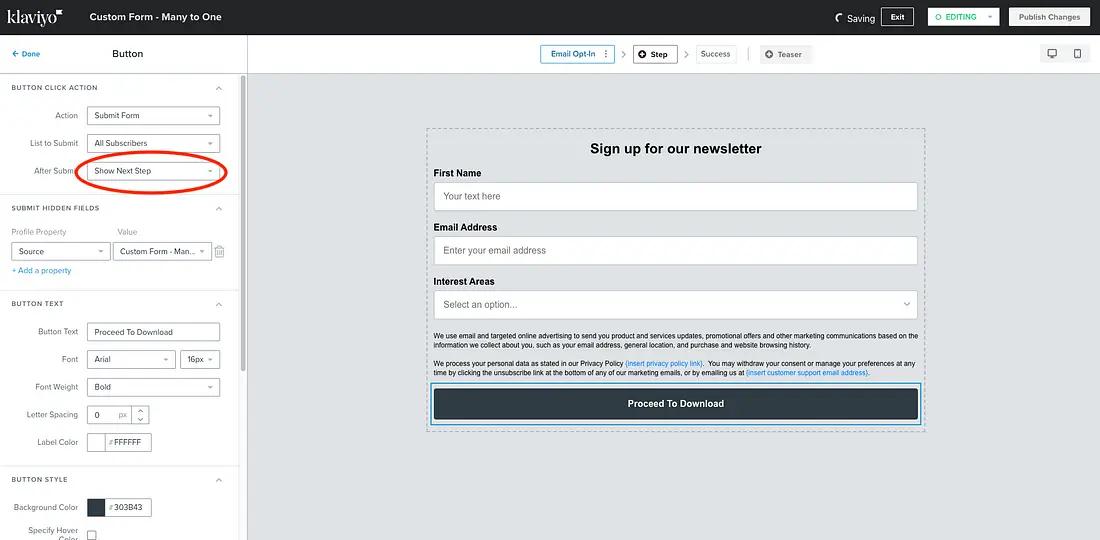
Once you have all the fields you want to capture, click on the button component on the bottom of the form, rename it if you would like, and in the “Button Click Action” section to the right, select “Show Next Step” for the After Submit field, then click Done in the top left. This is required for the redirect logic to function, which we will touch on in the 3rd step.
You can edit the Success step of the form, but it will only appear briefly before the user is redirected.
Once the form is set up, you will want to embed it onto your website. Go to Target & Behavior, and you will see the embed code at the top. Copy this code, and paste it into the HTML page where you want it displayed on your site. Now it should appear on your website, and if you complete the signup form, you will see a new user created in your Klaviyo account, along with any Profile Properties you added with the form.
Step 2: Create a Hosted Page in Klaviyo and add custom logic
For this step, you will need to make sure Hosted Pages are enabled for your account. Create a new Hosted Page and copy the code at this link
At a high level. this code does a couple of things:
- Loads the Klaviyo Object for later use
- Gets the user’s email from the URL parameters, detailed in the next step
- Gets the URL the user came from (referrer link)
- Uses that URL to match against the download_links_dict dictionary and retrieves the download link for the gated content
- Calls Klaviyo’s Identify API using the Klaviyo object and makes the referrer Pathname a profile property, with “true” as the value
- Downloads the file, then redirects back to the referrer URL
The most important piece to this code is the download_links_dict, which is a dictionary containing website pathnames as keys, and corresponding downloadable file pathnames as values. For example, users are prompted with the signup form we created at “www.website.com/product/whitepaper.html”, and the corresponding white paper that can be downloaded is hosted at “www.website.com/product/downloads/whitepaper.docx”. So in the dictionary, the key-value pair is:
"/product/whitepaper.html": "/product/downloads/whitepaper.docx"You will need to replace the key-value pairs in this dictionary with the links and download path names that correspond to your site. The script will then automatically create the download link using the URL that the user came from, and then trigger the download.
Step 3: Add JavaScript to the Embed Form to listen for a submissions and redirect the user to the Hosted Page.
By default, the Hosted Page doesn’t know anything about the user, as the Klaviyo cookie is not passed to it. Additionally, the signup form editor doesn’t accept dynamic URLs for the Form submit action, so we can’t put Django syntax for the user’s email in the signup form editor. As a result, we need to send the user’s email as a URL parameter prior to redirect, and is the reason why we set “Show Next Step” in step 1.
On the page with the embedded form we added in Step 1, copy the script below, replacing the following variables:
- “formId” with your own form’s ID — This is a six character ID that can be found at the end of the form editor URL
- “url” variable with your hosted page URL — You can get the URL by clicking preview in the Hosted Pages editor and copying the URL that appears.
This script listens for the submission of your embedded form, adds the email to the parameters of the hosted page url after base64 encoding it, and then redirects to the hosted page.
<script>
  window.addEventListener('klaviyoForms', function(e) {
      if (e.detail.type == 'submit' && e.detail.formId == "XXXXXX") {
          const emailEnc = encodeURIComponent(btoa(e.detail.metaData.$email));
          const url = `YOURHOSTEDPAGEURLHERE`
                window.location.assign(
                    url + `?email=${emailEnc}`
                );
      }
  });
</script>
Once this is live on your page, you can test the whole setup by submitting the signup form, validating that the file is downloaded and that you are redirected back to the original page, and validating that your user was created/had the correct profile properties added.
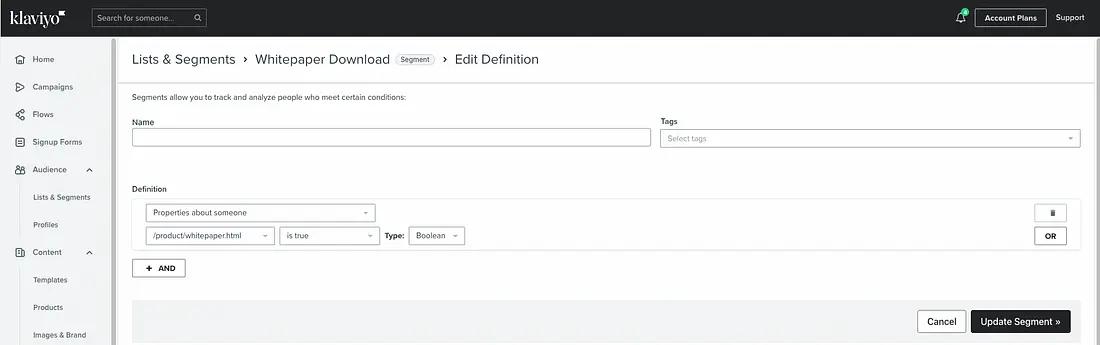
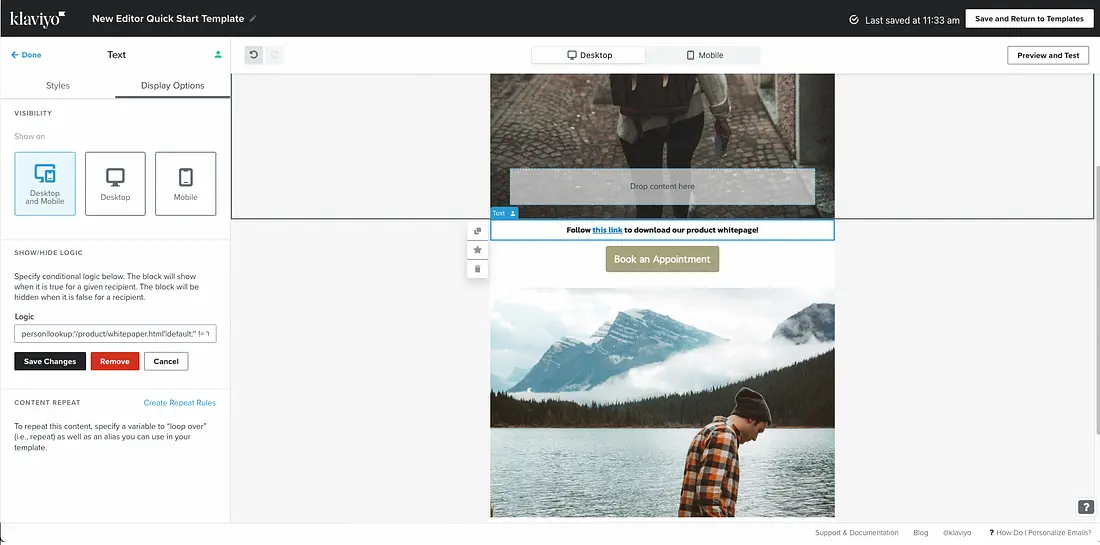
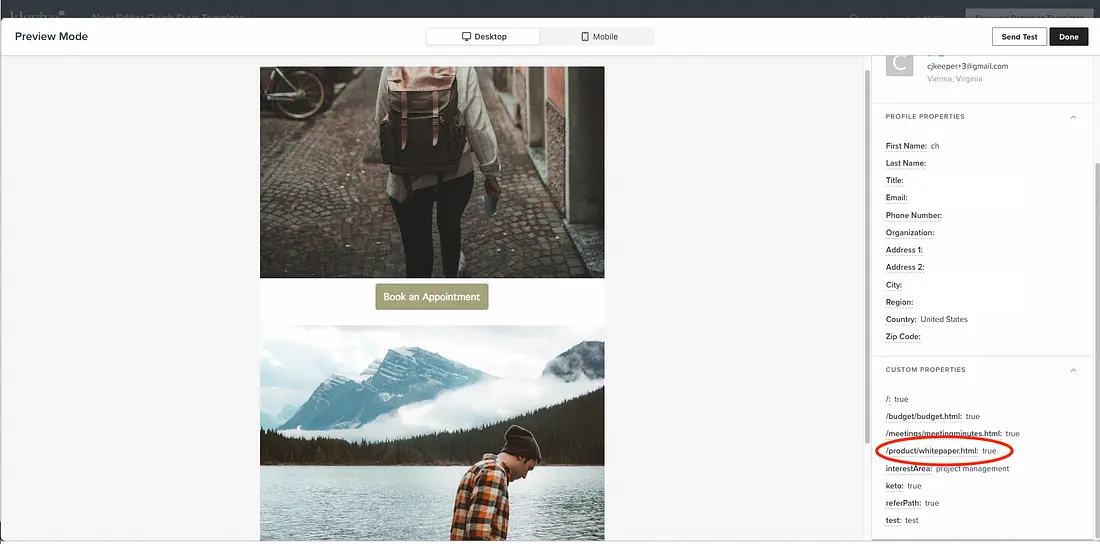
Using the new profile property added from the Hosted Page, we can now segment on users that have downloaded a specific document, or conditionally show/hide blocks in an email, like below:
Final Thoughts
It is worth highlighting that this is just one example of a way to use Klaviyo’s Hosted Pages feature, with the hope that this article can act as inspiration for other ways to leverage Hosted Pages. With some creativity, there are lots of other ways to use them as part of your site. You are also able to create multiple Hosted Pages, so the number of creative Hosted Page solutions you can develop are endless!
